Have you ever wondered how to resize your photos in a quick and easy way? Well, for those of you who own a Mac, this thing can be done quickly by a simple workflow with Automator. Here I'll write a sort of tutorial in which I'll explain how to resize and rename a picture or a group of them.
So, first, go to your Applications folder and open Automator. If you use Leopard, the window is this: you must choose the Ad Hoc option.

Now you'll get the main window: in the left column there are all the available actions and on the right there is an empty space where you'll put the selected actions by a simple drag-and-drop operation.

The first action you have to import is that of "Obtain Specified Elements in Finder": you find this in the Documents and Folders library: drag and drop this action into the left panel.

Then, you select the "Copy Finder Elements" action and import it on the right. Here you can specify where do you want to put your resized pictures. I've choosen the Desktop folder for clarity.

Then, go in the Preview library (if you use Tiger) or in Photo library (if you run Leopard) and import the Resize Pictures action. Here you can specify what will be the dimensions of the new picture and you can choose to specify it in percentage or in pixels of the longest side of the picture. I've choosen this second one and specified 800 pixels.
The next move is to rename the file, so import the dedicated action (found in the Finder library) and specify the way you want to rename the picture. I've choosen to add a short string at the end of the file name ("_B" in my case). So the final result should look like this:

At this point, save this workflow choosing "Save as Plugin for the Finder". Now, you are ready to resize you picture simple by right-clicking on a picture, choosing “Other”, than “Automator” and selecting the Resize option you have already created.
Simple, easy, quick: the power of Mac.

Note: all the figures here refer to the italian OS X 10.5 but I think that it's the same in other languages.


Probably, you have seen this picture before. But here, there are some post production features that I want to discuss with you. The most visible is a kind of comics-blurred effect. To obtain this, you have to follow these steps:
  1. First, you take the original picture and make two copies of it.
  2. Second: open Photomatix, click on Automate, then on Generate HDR.
  3. The program will ask you the photos to open as HDR. You must select the copies just created and ignore the message of exposure by clicking OK.
  4. Once the HDR image is created, click on Tone Mapping.
  5. Then, if you want, you might adjust it and then save it.
Now you can re-iterate these operations, creating two copies of the HDR image just saved. At the end of every cicle the colors will appear more saturate, so consider to desaturate them by using the appropriate Photoshop function. Furthermore, in order to obtain the blurred effect, I added the noise reduction filter in Photoshop, reducing the details percentage. At this point I have modified the tone curves and the proportions between lights and shadows.
This first result is not so wonderful, but I have to improve this technique that I find very nice.

In these days I have no time to improve my photographic technique, but I'm experimenting black and white (hereafter B&W) photography. I have to admit that I prefer colored pictures, but actually even B&W could be funny.
Indeed, as in colored photos, even with B&W you have to take enough time in the digital darkroom. Obviously, the parameters you have to modify are less than the previous cases, but you still obtain nice results.
Here I post two photos (larger versions can be found by clicking on the thumbnails, re-directing you to relative Flickr pages) that have been corrected in some parts with different editing programs.
In the first photo there is something like a barbed wire on a blurred fields and hills background. At the moment of the shot, the problem I had in mind was that of highlighting the wire but, at the same time, not to loose too many details of the background. There was another problem: it has just started to rain and I had not the time to adjust properly the settings of my camera. So I shot in "P" program (something like a semi-authomatic mode) in JPEG with only the B&W setting selected. The result is amazing: the wire is visible and you still can distinguish the background (I mean: you see the blurred hills and fileds, but that's enough to contextualise the wire). At home, I imported that picture in Apple's iPhoto and adjusted it working on sharpness, color tone, contrast and levels. The result is this.

Legami
Exif data: 1/200, f/10, 18 mm, ISO 200, P program

The second picture is a classical landscape photo. Once again, I shot in "P" mode, JPEG quality and with the digital B&W filter. At home I adjusted that picture working with Photoshop: I added two levels (curves and levels) and regulate them in order to have an improved contrast on the dark tones. Indeed, with B&W you have to make sure that white is white and black is black. Also the midtones - the so-called grey scale - is very important: that's why I had to work on the levels. Anyway, the result is this.

B&W Landscape
Exif data: 1/250, f/11, 55 mm, ISO 200, P program

I hope you like those first attempts in taking B&W photos. Let me know what you think about that.


The indiscretions are confirmed: today Canon Europe officialy released the new DSRL camera, the EOS 1000D. The reason that pushes Canon to produce another entry level camera is “to take the next step in creative photography”, and the new EOS 1000D “offers the perfect entry point to the world of D-SRL”.
The most important feature of this new DSRL is the lightest body ever produced by Canon for the EOS digital systems. The material is plastic and the weight of the body is of about 450 g. The other features are a combination of those of the 350D, 400D and 450D. From the “old” 350D the new 1000D has the same number of AF points (seven) but it is not possible to control them in manual mode. From the 400D, the 1000D has the 10 megapixel CMOS sensor, Picture Styles and the 2.5” LCD screen, and from the 450D it has the Live View mode and the SD/SDHC card slot. Obviously, it is compatible with Canon Speedlight flashes and with Canon EF-S and EF lenses. For the full list of specifications see here.
It will be sold in the kit version with Canon EF-S 18-55mm IS lens at a price of about 750 € (provisional).
In my opinion, the new EOS 1000D is useless because there is not the need of this camera. There are already the 400D and 450D for that price and with the same features. Indeed, I see no reasons why I have to spend 750 € for a camera that have less feature of the 400D and it costs 150 € more. I think that Canon should evaluate carefully its strategy and it should concetrate more on the professional side of digital photography.
Anyway, here some useful links.
- The official press release (PDF)
- Images of the new EOS 1000D
- Official web site

EDIT: rumors indicate that the price should be around 500 €, not 750 €. We'll see.

Today I finally had the opportunity and time to devote myself to photography, especially in the composition of frames. The beautiful locations of these shots are the hills near the italian border with Slovenia, where between 1915 and 1918 Italians and Austrians fought hard, resulting in the famous Battle of Caporetto. Hence, I visited the trenches and taken so many photos. As I explained earlier, I focused my attention in the composition, expecially in the "rule of third". I also tried to improve my technique; however, the results are not so exciting: indeed I shooted almost all the photos in "Apeture Priority" mode, with an aperture of about f/5.6. That is: the depth of field isn't very large. Furthermore, I shooted only in JPEG mode, so the quality is not of the best. Another feature, common in all the shots, is the fact that I used the circle polarizing filter in order to avoid the reflections (it had just rained) and to saturate colors.
Anyway, take a look to the photos and let me know what do you think about them.


Lonely
Lonely

A Trench
The Trench

Going There
Going There

Valley
The Valley


These are only few shots. To see more, stay tuned on the corresponding Flickr's Set (named, of course, "Caporetto").

The 'rule of third' is probably the most fundamental rule in photography. It consists in mentally dividing your viewfinder or LCD screen in nine parts, resulting in nine sub-frames of your picture. You can follow the imaginary lines to compose the frame: you can use those lines to include your subject, or separate two or more different subjects including them into different sub-frames. But also, you can allign the main subject(s) to one of these lines.
I think that this rule involves so much the symmetry of a scene: breaking this rule means, basicaly, breaking the symmetry. It will be so difficult to obtain stunning pictures without this symmetry: only the true artists can do this. For us, common human beings, it's best to follow this rule, at least in its general aspects.
This is the reason why I started to look at all my old pictures with this rule in mind. I admit that I haven't found so much material to work on, but I found a nice photo taken last saturday in Venice. I shooted it in RAW mode and the result was a very bad photo. However, I decided to work a little bit on it, and the final result is this.

Exif data: 1/4000, f/5.6, 55mm, ISO 800, Aperture Priority
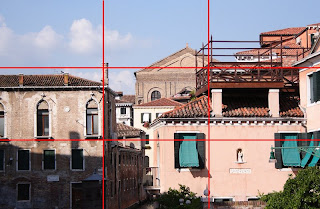
Well, I agree with you: it doesn't say anything but it's a good example of the rule of third. Indeed, as you can see in the following figure, there are some of the lines in the scene that are alligned with the lines of the sub-frames.


Take for example the first column in the left: the front of the building is completely included in that. Also take the central column: the church front (or back?) is once more included. Yes, I know that this shot isn't amazing, but I think that it gives you an idea of how this mechanism works. Undoubtedly, when finally I will have some time for me, I'll improve this rule, shooting more impressive scenes.

RAW or JPEG? This is the ethernal dilemma of digital photographers. Let make some clarity about these two formats. JPEG stands for Joint Photographic Experts Group, a compressed format particularly suitable for web publishing or emailing or other digital uses. If you want print your photos or post-processing them, than choose the RAW way. RAW is not an acronym, but it's a format that is not compressed and offers you several more possibilities to elaborate your pictures in the digital darkroom process. RAW is everything that the sensor of your camera sees at the moment of the shot. Instead of JPEG picture, which are compressed via the internal processor of the camera, the RAW images are exactly what sees the sensor, which is nearly what your eyes see.
I personally use JPEG quality if I have to shoot only for fun: if I don't want to lose so much time in front of my computer, I choose immediately JPEG. Instead, if I want to create particular images (HDRs or other things) I prefer the RAW way: using various type of software (like Canon Digital Photo Professional or Adobe Photoshop) I can modify easily several parameters like sharpness, contrast, saturation, white balancing, picture styles, RGB channels and many others. For digital elaboration purpose the RAW format is the best choice, I think.
But, if you want to use JPEG format also for post-production, you can do this thing: I've said that this format is compressed, so when elaborating a JPEG image, the result is a new JPEG image with a loss of information. To avoid this, the first time that you open the JPEG image with a photo editing software, you save it as a TIFF image. Then, you can proceed to elaborate the TIFF file without any loss of detail and information. 
There is also another difference between the two formats: JPEG mode easily handles low contrast scenes, while RAW images handle wide-contrast scenes and highlights better than JPEG images. That is, RAW format has a bit more tolerance in the highlight areas of a scene, so one has a better chance of not getting overexposed images. Hence, when you take a picture, look carefully at the contrast range of the scene: the higher the contrast, the more you should consider shooting in RAW mode. 
However, if your purpose is to take consecutive frames in order to capture an action (like in sport photography), you should consider the dimension of image files. In the best quality, JPEG images occupy 3 Mb, while RAW pictures about 8 Mb. So it will take more time to your camera to save RAW images in the memory card than JPEGs. Therefore, if you want to capture a high speed action sequence, choose the JPEG format.
These are my advices, but there is another way you can go through: if your camera has the function of shooting both in RAW and JPEG (sometimes called RAW + JPEG), than choose this. For every frame you will have a JPEG file and a RAW file, so you can decide what do you want to do with these.
Personally, I use RAW mode when I have to make impressive shots and JPEG mode if I want to take pictures for fun. Anyway, go out and shoot: this is the best thing you can do. Everytime. 

Welcome on this blog. Here we'll talk about digital photography together with image post-processing and some tips & tricks about this beautiful art.
I have to say some things before starting this new experience: I'm italian, so my english is not perfect, but I hope that you'll understand the most important concepts that I will explain here. Another thing is the fact that I'm a beginner in this field, so in this blog I'll tell you my new experiments with some tricks that I'll find to be useful in order to obtain good looking photos.

My passion - digital photography - has ancient origins. Since I was I child, I always looked at my grandfather film camera with curiosity, wondering of what mechanism could permit to light to draw beautiful images with vivid colors such as those old slides and prints. Unfortunately, this curiosity soon desappeared, and serveral years passed until, about one year ago, I started again intresting in photography. I still have my grandfather's film camera, but I prefer to take the digital way for several reasons. The first is clearly the differences between the cost of film photos and the digital ones: the latter has almost zero-costs and almost infinite possibilities. Indeed, while with film photos you have a limited number of available shots, with digital cameras you have the great possibility to delete the picture you have just taken and take a new one. Furthermore, you can adjust the sensibility of the sensor (the ISO parameter) every time you need, dependeng on the light conditions.

Now, let me tell you few other things. In the right sidebar I will add some useful links to digital photography websites and it will be updated regularly (I hope). There is also the link to my Flickr page, where you can find many of my shots.

But now, let the photos speak! The first picture I post here is a photo that I took some days ago when I was in Venice. It isn't so much wonderful, but I like so much the colors of the trees and the sky.


Shot in RAW quality and adjusted with Photoshop CS3.